Join Task [DEPRECATED]
The Join Task's purpose is to introduce you to GitHub and how using this tool will be required for all your future tasks at [P1]. In short, it will require a small change to a GitHub repository. The Join Task is also checking that you can commit to starting and finishing a task.
How do you Begin?
You may be asking yourself, how do I begin? That is a great question and the answer is... it depends.
- You may have already used GitHub in the past many times and are a pro. That's awesome, check out the objective for the Join Task and get to work.
- You may have used GitHub already but not for a while and just need to refresh your memory. Feel free to checkout the GitHub section and look for your preferred method of interacting with GitHub. Otherwise follow along here where it will be laid out step by step.
- You may not have a clue about GitHub and you just heard the word today. Excellent, you learned something new. Keep following this guide to continue learning.
Objectives
The goal of this exam is to have you understand how to work with Unity and GitHub so that you can get content you create merged into the project without issues.
Instructions
Everything will be laid out in steps. If anything sounds confusing, please refer to the GitHub section for even more details.
The flow of this task is:
- Download the test demo and play it
- Record your session mentioning any comments or bug findings
- Upload your recording to YouTube
- Set up Unity
- Clone
- Create new branch
- Make changes
- Commit
- Push
- Create pull request
If you can simply follow that, great, but if you need it broken down further continue on.
Step 1: Download The Test Demo
First, Go to this itch.io link and download the test demo for Skyjellies.
Step 2: Play test the demo and record your session
Record your playthrough session and mention your thoughts and any bugs you find.
Then upload your recording to YouTube.
Step 3: Setting up Unity
Download Unity Hub and create an account if you didn't have one already and download the Unity version: 2021.3.20f1 as it's the one we use for developing Skyjellies
Step 4: GitHub
First, you need a way to use GitHub to submit your work. There are many ways to do this but our recommendation is GitHub Desktop. It is visually pleasing and easy to use for most. If you haven't installed it yet, do so HERE.
Step 5: Cloning
Clone the GitHub repository of Skyjellies (You'll find it in the Trello card of the join exam). There is a green button that says code. Click that and choose your preferred way of cloning. In this case with GitHub Desktop installed, click "Open with GitHub Desktop".
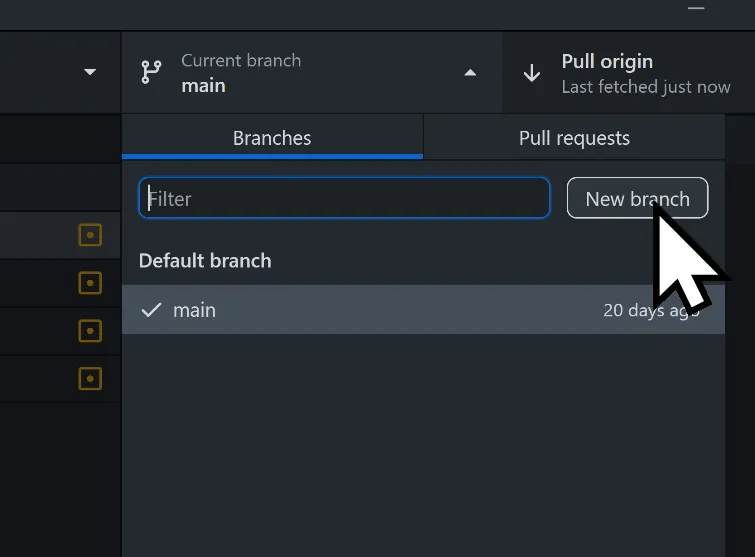
Step 6: Create Branch
Create a new branch. In GitHub Desktop, At the top, there is a "Current Branch" button that says that the current branch is "main". Click that, enter a name for your branch, then click new branch.
For Example: "discord-name-join-task" or something similar.
Step 7: Locate the File Required for Change
Now you need to actually make your change to the repo. Locate where the project is saved on your computer. After you locate it follow the next step.
If you want to be one step ahead you should download your preferred IDE. Visual Studio is the most fully featured for our uses but any will do. You can download Visual Studio HERE.
Step 8: Create a new text file
Create a new text file (Notepad for example) and name it with your P1 Discord name DiscordName.txt. This file should include the link to the YouTube video you made and a list of bugs you have possibly found!
Step 9: Commit Your Change
Time to commit your changes to the GitHub repository. To commit in GitHub Desktop, on the left hand side, you check each file you want to commit. Under the checked files at the bottom, enter a summary and any details, finally, press commit.
Step 10: Push Your Commit
Next is to push your committed changes. There are two ways and you may have figured it out already after you committed. There is a big blue button within a bigger blue box that says "push". Push that button.
Step 11: Create a Pull Request
Create a Pull Request(PR) that will serve as proof that you added your name.
Step 12: Using /review on Discord
Now that you have finished your join task and created a PR, make sure to move your Trello card to "ready for review" on the Trello board. Also, on Discord you will need to type /review to get your task reviewed. Check HERE if you don't know what that means. After, you submitted the /review, send a message in the programming team chat.
/review is a Discord command that can be used in any chat. It will require a currency that we call Trust to create a review. There are various ways to get Trust and it will let you know how when you enter the command. It requires 150 Trust. For more info about our Trust system check this Link.
Congratulations!
Good job completing the Join Task. Now the real fun begins... you can continue reading the rest of this document at your leisure. Look at the Introduction section if you haven't already.
Now you are ready to start your Apprenticeship. Checkout the Apprenticeship section under the Everything [P1] section for all the details and how to begin.
If you haven't already you will need to download an IDE and Unity to get to work on your apprenticeship tasks. Check out the IDE and Unity sections to make sure you have the ideal setup to work on our projects.
If you are interested in learning about Crews go ahead and check the Crew section. The list of crews and what they are focusing on can be found on the crew section on the Discord.
Questions?
If you have any questions check the FAQs first. If your question isn't answered or you didn't get the answer you were looking for ask the programming team on discord. If you feel many new members will have the same question, leave any thoughts, comments, and questions on your Join Task Trello card. Speak your mind but be kind. We are all trying to learn and grow.